
Easy Science Experiments for the Classroom Engaging Activities for All Grade Levels
Many students enjoy learning science when it feels hands-on and fun. Easy science experiments in the classroom can help students understand important ideas without using complicated tools or materials. These simple experiments give students a chance to ask questions, make predictions, and see real results right in front of them.
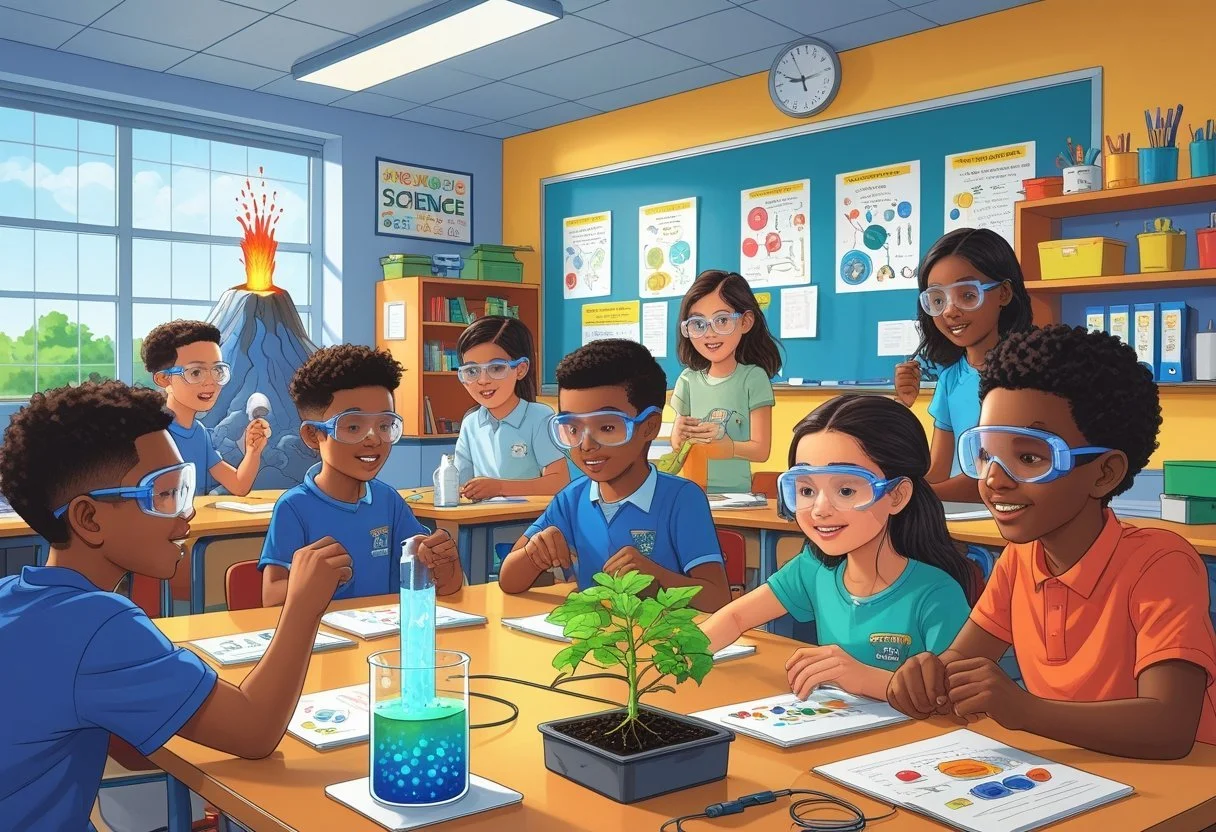
Teachers can use everyday items for experiments in chemistry and physics that fit different age groups. These activities can be done safely and quickly, making science class more interesting and interactive.
Key Takeaways
Simple experiments help students learn key science ideas.
Everyday objects can be used for fun classroom activities.
Experiments can be adapted for students of different ages.
Fundamentals of Easy Science Experiments
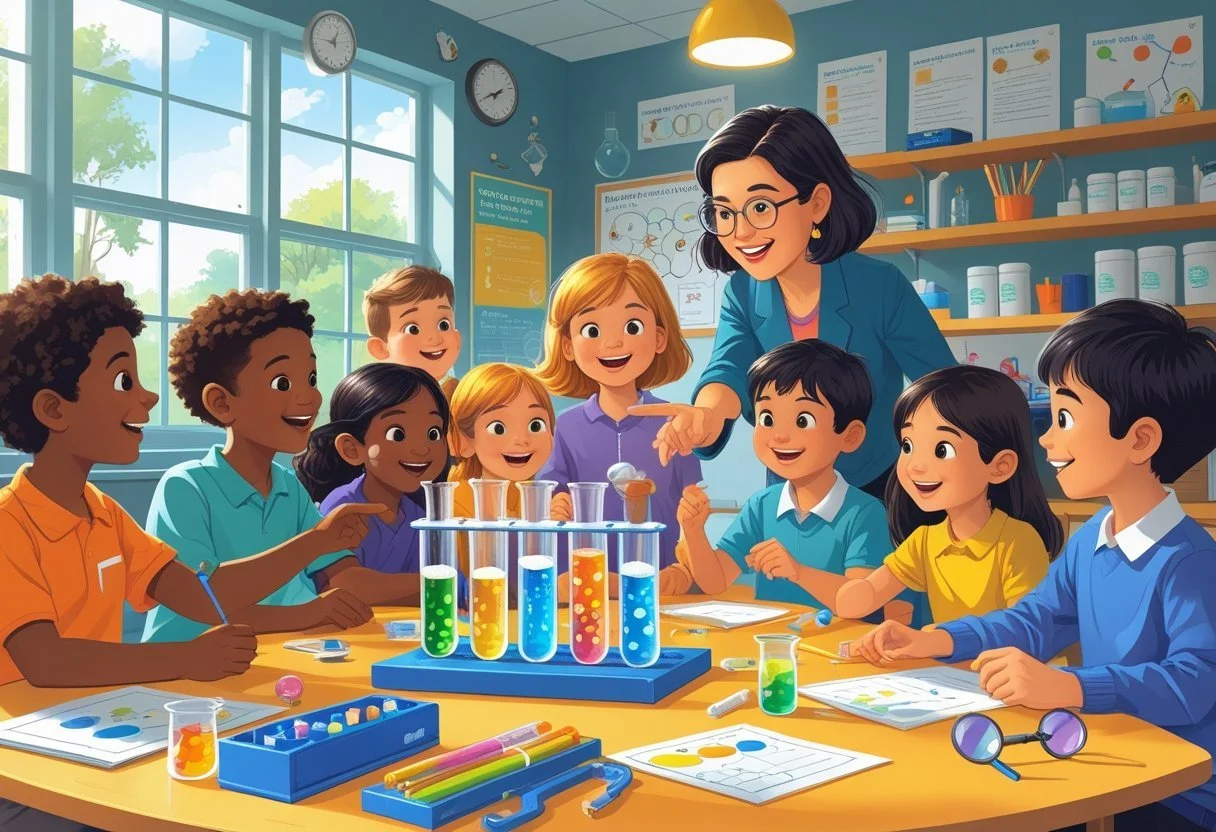
Simple science activities for kids can help them learn faster and remember more. Using hands-on experience and familiar items in the classroom makes experiments more engaging and accessible.
What Makes a Science Experiment Easy
An easy science experiment is simple to set up and uses clear instructions. It should require few materials, which are safe and affordable for classroom use.
Experiments work best when they avoid complicated steps. Teachers often look for science activities kids can do on their own or in small groups. Most easy science experiments focus on clear, visible results. For example, watching baking soda react with vinegar or seeing how plants grow with different amounts of light.
These experiments aim to show basic scientific ideas. A straightforward procedure helps everyone follow along without confusion.
The Importance of Hands-On Experience
Hands-on experience allows students to see and touch what they are learning about. This makes it easier to understand big ideas in science.
When kids do the experiment themselves, they stay interested longer. They can ask questions and test what happens if they change something, like adding more water or using a different material. This helps them think like real scientists.
Teachers see better results when students interact directly with easy science experiments. Mistakes become chances to learn, not reasons to give up. Experiments like building paper bridges or testing what sinks or floats make science real and memorable.
Choosing Everyday Items for Experiments
Using everyday items makes science activities for kids much simpler. Common supplies—like paper, cups, salt, sugar, and food coloring—are easy to find and cheap to replace.
This saves time for teachers and helps avoid safety problems. Students may already have these items at home, making it possible to repeat experiments outside of school.
Here is a short list of everyday items often used in easy science experiments:
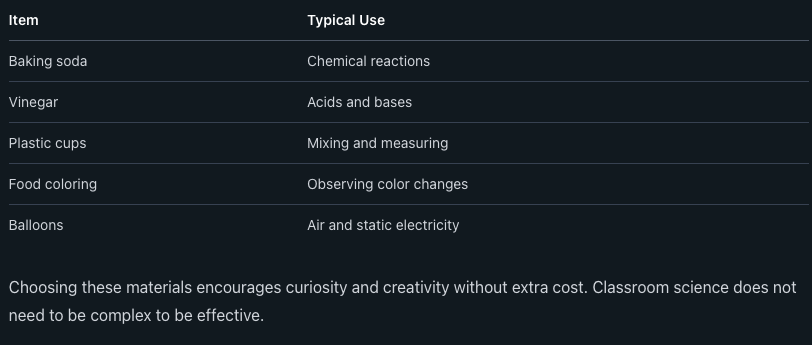
Choosing these materials encourages curiosity and creativity without extra cost. Classroom science does not need to be complex to be effective.
Setting Up Your Classroom for Science
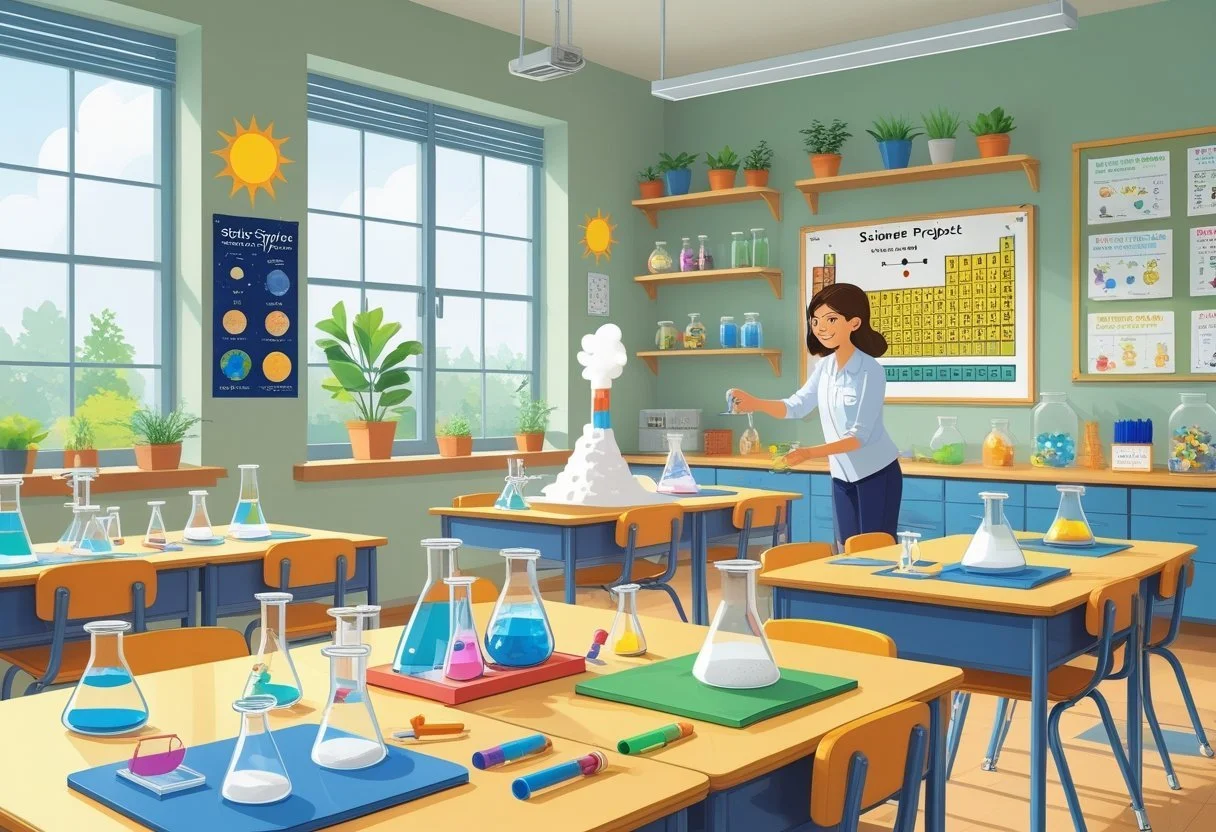
Preparing a classroom for science experiments helps make activities safe, organized, and engaging. Teachers can use simple steps, clear rules, and the right materials to create an environment that supports learning.
Safety Guidelines and Preparation
Safety is the most important part of any science activity for kids. Set up clear rules, like wearing goggles and tying back long hair during hands-on experiments. Always have a first aid kit ready, and know where the nearest sink or water source is in case of spills.
Before starting any easy science experiment, review the steps and possible risks with students. Label all supplies and chemicals. Make sure students know what to do if something spills or breaks. Clearly mark off-limits areas, like where cleaning supplies are stored.
Post emergency contacts and basic safety instructions on the classroom wall. Practice simple safety drills, such as what to do if someone gets something in their eye. Encourage students to ask questions if they feel unsure or need help.
Supplies and Tools Checklist
Having the right tools makes science experiments for kids go smoothly. Many easy science experiments need common items found at home or in school. Keep these organized in bins or labeled drawers for quick access.
A basic checklist might include:
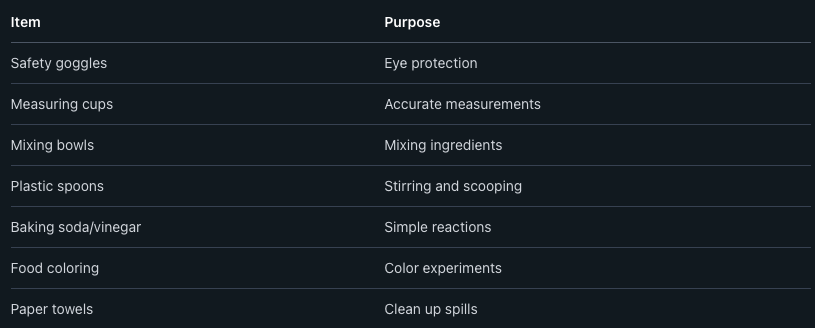
Include extra paper, markers, and notebooks for written observations. Double-check that you have enough supplies for each student. Label everything to avoid confusion during busy lessons.
Encouraging Curiosity and Creativity
Giving students chances to ask questions and share ideas helps them love science activities for kids. Set up a wall or board where students can write “What if” questions before or after experiments. Invite them to suggest new experiment ideas or ways to test different variables.
Let students work in small groups to solve problems together. Give them time to talk about what they expect to happen and what they notice. Offer praise for careful thinking and creative ideas, not just “right” answers.
Allow students to draw pictures or write short notes about their results. When possible, let them choose some materials or methods to test their own ideas safely. This helps them stay interested and builds confidence in doing science.
Formulating Hypotheses and Making Predictions
Students can learn to make good guesses about what will happen in science experiments. These skills teach them to think carefully and use evidence to support their ideas.
Understanding the Scientific Method
The scientific method is a step-by-step way to solve problems in science. It usually begins with a question about something that can be tested.
A student might ask, "What will happen if I put sugar in warm water?" After forming a question, the next steps are to make a hypothesis, then test it with an experiment.
A basic table can help students remember each step:

These steps encourage students to organize their thinking and look for answers in a clear way.
How to Guide Students in Hypothesis Formation
A hypothesis is a guess about what might happen during a science experiment. It should be clear and testable.
Teachers can help students by using sentence starters such as:
"If I do ___, then I think ___ will happen because ___."
"I think that ___ will make ___ change because ___."
Students should use what they already know to support their guesses. For example, they may know that sugar dissolves faster in warm water than cold water. Asking students to explain why they think something will happen helps them use evidence instead of a wild guess.
Encourage students to write hypotheses before starting any experiment. This builds the habit of careful thinking.
Promoting Prediction Skills in Young Scientists
Making predictions is an important science skill. A prediction tells what someone thinks will happen during an experiment based on facts or past experience.
Teachers can help by:
Asking students to share what they think will happen and why
Encouraging them to notice patterns in experiments
Using everyday examples, such as predicting the weather
Practicing with simple science experiments, such as mixing baking soda and vinegar, helps students make and check predictions.
Teachers can ask students to record their predictions in a table, like this:

When students compare predictions to actual results, it helps them learn from their mistakes and improve future predictions.
Popular Classroom Science Experiments
Students learn best when they can see science up close. Simple experiments with household items let them observe natural forces, chemical changes, and water movement right at their desks.
Tornado in a Bottle
A tornado in a bottle uses two plastic bottles, water, and duct tape. By connecting the bottles and swirling the water, students see a spinning vortex like a tornado. This experiment teaches about vortex formation and air pressure. It’s easy to set up and safe for most ages.
To make the tornado, fill one bottle two-thirds with water. Attach the second bottle upside down using a connector or duct tape. Turn the bottles over and swirl the top bottle in a circular motion. The water spins down in a funnel shape.
Key Points:
Shows how tornadoes form
Uses simple supplies: bottles, water, tape
Demonstrates vortex action, gravity, and air movement
Walking Water Science Experiment
The walking water experiment involves water, food coloring, and paper towels. Students place cups in a line, fill some with colored water, and connect them with paper towels. The water climbs up the towels and mixes colors in the empty cups.
Capillary action is the main principle. The water travels through tiny spaces in the paper towel fibers, moving from one cup to another. It's a visual way to see how plants get water from soil.
Materials Needed:
6 clear cups
Water
Paper towels
Red, blue, and yellow food coloring
Steps:
Fill every other cup with water and add food coloring.
Fold paper towels and place between cups.
Watch as colored water "walks" into empty cups and new colors appear.
Sticky Ice Experiment
Sticky ice uses salt, string, and ice cubes to show how salt changes ice’s melting rate. Place a string on an ice cube and sprinkle salt on the string. After one minute, the string lifts the ice when pulled. Salt lowers the freezing point of water, causing a brief melt. As the ice reforms, it traps the string.
Students see the effects of freezing points and melting firsthand. This experiment works well for weather and physical science lessons.
What you need:
Ice cubes
Salt
String
Water
Steps:
Put the ice cube on a plate.
Lay a piece of string on top of the cube.
Sprinkle salt on the string where it touches the ice.
Wait one minute and gently lift the string.
This activity lets students observe melting, freezing, and how salt interacts with ice.
Fun with Kitchen Chemistry
Kitchen chemistry uses common household items to teach science. Students learn about chemical reactions, acids, bases, and how everyday materials can act as scientific tools.
Skittles Experiment
The Skittles experiment demonstrates diffusion and color mixing. Students need a plate, a pack of Skittles, and warm water. Arrange the Skittles in a circle near the edge of the plate. Slowly pour enough warm water into the center to cover the bottom.
As the water touches the Skittles, the colored sugar coating dissolves. The colors move toward the middle but stay separate for a while. This shows how different substances spread out in water. Teachers can discuss why the colors do not mix right away and what diffusion means.
This experiment is quick and visually striking. It makes it easy to see how molecules move. It also encourages students to predict what will happen if they change the arrangement or use cold water instead of warm.
Cabbage pH Indicator
Red cabbage can act as a natural pH indicator. Cut up red cabbage leaves and place them in hot water. After about ten minutes, strain out the leaves. The purple liquid left behind is the indicator.
To test household substances, pour a small amount of cabbage juice into clear cups. Add a little of each test item—like lemon juice, vinegar, baking soda, or soap—to separate cups. The liquid's color will change based on the substance's pH:
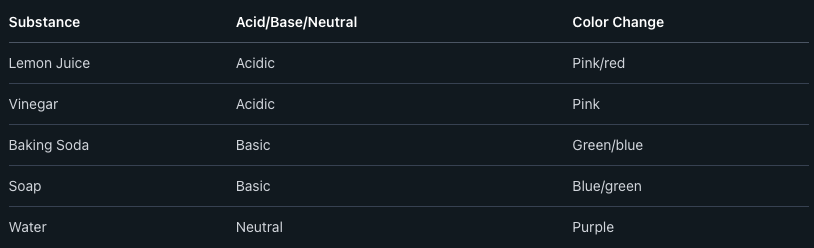
A color change means a chemical reaction has occurred. This experiment helps students learn to test for acids and bases using items from the kitchen.
Fireworks in a Jar
Fireworks in a jar teaches about density and how liquids interact. Fill a clear jar most of the way with warm water. In a cup, mix 2-3 tablespoons of oil with a few drops each of red, blue, and yellow food coloring.
Stir the oil and coloring gently with a fork. Pour the oil mixture into the jar and watch as the colored drops slowly sink and burst into the water, creating bright streaks like small fireworks.
The science behind this is that oil and water do not mix, and food coloring is water-based. When the drops break through the oil, they start to mix with water, spreading out in colorful patterns. This activity is safe and easy, and it clearly shows how liquids with different properties interact.
Exploring Physics with Simple Activities
Hands-on science experiments help students see how physical principles work in real life. These activities use basic materials, so they are easy to try and understand.
Walking on Eggs
Walking on eggs lets students explore the idea of weight distribution and pressure. Eggs have a strong, curved shell that spreads out force over the whole surface. When someone stands or walks on several eggs, the pressure is shared, stopping the eggs from breaking if done carefully.
Materials Needed:
Uncooked eggs (in cartons)
Flat surface
Clean socks (optional, for hygiene)
Before the experiment, students check the eggs to make sure none are cracked. They gently stand, with socks on, one foot at a time on the eggs, keeping their weight as even as possible. The key is not stepping too hard or putting all weight on one egg.
This activity is a safe way to show the physics of force, pressure, and surface area. It also helps students learn about structures found in nature.
Static Electricity Demonstrations
Static electricity shows up in daily life, like when hair stands up after rubbing a balloon. Teachers often use this simple experiment to explain the transfer of electric charge.
Common Demonstration Steps:
Blow up a balloon and tie it off.
Rub the balloon on wool or a sweater for about 30 seconds.
Hold the balloon near small pieces of paper or someone’s hair.
The static electricity from the balloon attracts the paper or pulls up hair strands. This happens because electrons from the wool or sweater move to the balloon, giving it a negative charge. The experiment helps students see how static electricity works and why charged objects attract neutral things.
Building a Hydraulic Elevator
A hydraulic elevator shows the basics of fluid pressure and force in motion. Students use simple items to build a model and see how liquids can move and lift objects.
Materials Needed:
2 plastic syringes (no needles)
Flexible plastic tubing
Cardboard or plastic for the elevator base
Students connect the syringes with the tubing and fill them with water. By pushing the plunger on one syringe, they watch the plunger in the other syringe move. If the elevator base is attached to one syringe, pushing down on the other can lift the base.
This experiment demonstrates Pascal’s Law: pressure applied to a fluid is passed along to all parts of the fluid. It helps students understand how real elevators and machines use hydraulics.
Adapting Experiments for Different Age Groups
Simple science experiments can be changed to fit the needs of kids at different ages. Teachers can make lessons easier or harder based on the students’ skills, so everyone stays engaged and learns something new.
Science Activities for Younger Children
Younger children learn best with hands-on activities and simple instructions. Teachers can use basic experiments, like mixing baking soda and vinegar to make bubbles, growing a bean seed in a clear cup, or exploring magnets with everyday objects.
These activities help children see changes and cause-and-effect right away. Safety should be a top priority—use non-toxic materials and keep parts large enough to avoid choking.
Teachers can use short, clear steps and visual aids. Asking questions like “What do you see?” or “What happens next?” helps children think like scientists, even at an early age.
Projects for Older Students
Older students can handle projects with more steps and complex ideas. Experiments like measuring how fast different objects fall, testing which materials insulate best, or building simple circuits let students explore topics using real data.
At this age, students can plan their own experiments or change variables to see new results. Teachers can introduce the scientific method with words like “hypothesis” and “control group.”
It is helpful to use tables for organizing results:
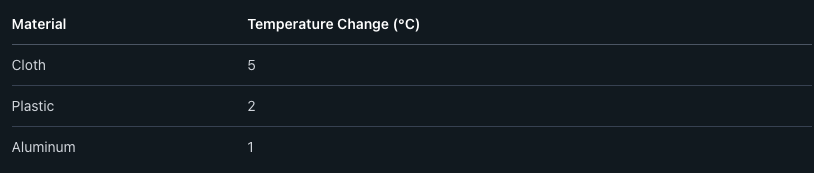
Working in pairs or small groups builds teamwork. Teachers should still give clear safety rules, since some materials or tools may require extra care.
Experiments at Home Extensions
Many simple science experiments can be done at home using common items like cups, soap, baking soda, or food coloring. Teachers can send home easy instructions so families can try activities without special tools.
Ideas include making a homemade lava lamp with oil, water, and salt, testing how different liquids clean pennies, or growing crystals with salt or sugar.
These experiments let students see science in everyday life. Sharing results in class or in a short report helps build communication skills. Parents can help supervise, making the activities safe and fun for everyone.
Frequently Asked Questions
Science experiments bring hands-on learning into classrooms. Simple materials and clear steps make these activities easy to manage for all grade levels.
What are some quick science experiments suitable for a classroom setting?
Baking soda and vinegar volcanoes are fast and interactive. The classic “dancing raisins” experiment uses soda and raisins to show gas bubbles in action.
Another easy option is making invisible ink with lemon juice, where students write messages and reveal them using a heat source.
Which science experiments can help introduce basic concepts to young students?
Growing bean sprouts in wet paper towels shows how seeds develop roots and shoots. Using magnets to pick up different items helps explain forces and materials.
Making a rainbow with a glass of water and a flashlight shows light refraction in an easy way for beginners.
How can teachers implement science experiments in a classroom with limited resources?
Teachers can use common items like cups, paper towels, baking soda, and vinegar. Many experiments need only water, salt, or food coloring.
Working in small groups allows sharing of materials. Simple demonstrations can still show important concepts without expensive equipment.
What are the best science experiments for demonstrating chemical reactions to students?
Mixing baking soda with vinegar clearly shows a reaction by producing bubbles and gas. The “elephant toothpaste” experiment uses hydrogen peroxide, dish soap, and yeast to make foam.
Combining steel wool and vinegar in a jar lets students see how rust forms as a result of a chemical change.
Can you suggest safe and educational science experiments appropriate for high school students?
Red cabbage juice as a pH indicator allows teens to test acids and bases using kitchen supplies. The “egg in vinegar” experiment demonstrates acid reactions and osmosis safely.
Students can also explore Newton’s laws using balloon rockets, keeping the activity hands-on and safe.
How do you design a science experiment lesson that is engaging for both younger and older students?
Select experiments with clear steps and visible results, like color changes or gas production. Allow students to make predictions and observe outcomes.
Offer optional challenges or questions for older students. Let younger students focus on what they see and feel to help everyone stay involved.